![]()
|
|
Introduction |
The layers palette allows you to select a layer to draw in, show and hide layers, lock layers, and delete layers; much like a drawing program. The main difference from a traditional drawing program is that you can have layers inside of layers, layers have a dimension which differs from the page size, and layers inside the active layer can be grabbed and the content changed with the object tool. Important distinctions in a desktop publishing program. If you import a drawing created in a traditional drawing program, that drawing may have layers, and you may import several such drawings on to a single page. PageStream can maintain the original layers, and the scope of each layer is limited to the parent layer, or if none, the page.
PageStream's layers are implemented as drawings themselves. Logically, a layer is a collection of objects that comprise a distinct drawing. Naming a drawing/layer enables easier manipulation in the layer palette, but it is not necessary to do so.
The active layer is the drawing or the page itself which contains the objects that are created and modified by the tools in the toolbox. If an imported drawing needs objects modified that comprise that drawing, you may make those changes without dissolving the drawing into a seemingly random collection of objects on the page. The active layer is set with the layers palette.
To create a layer with the menu: Select the Object tool from the toolbox and select the objects to put into the new layer. Choose Make Drawing from the Drawing submenu in the Object menu.
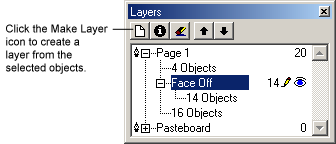
To create a layer with the Layers palette: Select the Object tool from the toolbox and select the objects to put into the new layer. Choose Show Layer Palette from the Window menu. The Layers palette will appear. Click the Make Layer icon.
Any drawing imported by choosing Place Graphics from the File menu, or pasted into the document by choosing Paste from the Edit menu, is also a layer and will appear in the Layers palette. Note: Bitmap and EPS objects imported or pasted are not drawings/layers.
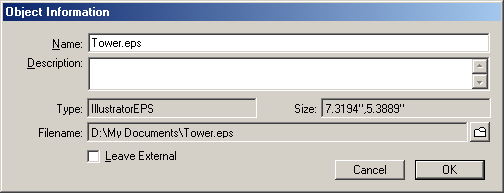
To name or rename a layer with the menu: Select the Object tool from the toolbox and select the layer to name. Choose Information from the Edit menu. The Object Information dialog box for drawings will appear. Enter the name in the Name text box. Click OK.
To name or rename a layer with the Layers palette: Choose Show Layer Palette from the Window menu. The Layers palette will appear. Select the layer to name. Click the Layer Information icon. The Object Information dialog box for drawings will appear. Enter the name in the Name text box. Click OK.
Flattening or dissolving a layer will cause the objects in that layer to be removed from that layer and place in the parent layer or on the page in the same stack order as they currently exist. The now empty layer itself will be deleted.
To flatten or dissolve a layer with the menu: Select the Object tool from the toolbox and select the layer to flatten. Choose Dissolve Drawing from the Drawing submenu in the Object menu. Note: To delete the layer and all the objects in the layer, choose Clear from the Edit menu.
To flatten or dissolve a layer with the Layers palette: Choose Show Layer Palette from the Window menu. The Layers palette will appear. Select the layer to flatten. Click the Flatten Layer icon.
Layers listed first in the list are on top of those listed later in the list. Imagine each drawing and free objects on individual transparent sheets. These sheets are stacked together and then viewed from above. The sheets may be moved up in down in the stack, in the parent layer or page that it is already in. Those that are on top of the stack will obscure any objects which lie beneath it.
To adjust the stack order of a layer with the menu: Select the Object tool from the toolbox and select the layer to move.
- Choose Bring to Front from the Stack submenu in the Object menu. The selected layer will be placed at the top of the (sub)stack.
- Choose Bring Forward from the Stack submenu in the Object menu. The selected layer will be placed on top of the item immediately above it in the (sub)stack.
- Choose Send to Back from the Stack submenu in the Object menu. The selected layer will be placed at the bottom of (sub)stack.
- Choose Send Backward from the Stack submenu in the Object menu. The selected layer will be placed under the item immediately below it in the (sub)stack.
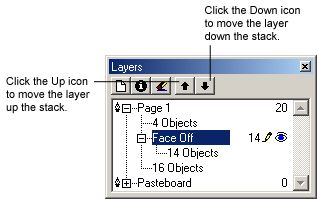
To adjust the stack order of a layer with the Layers palette: Choose Show Layer Palette from the Window menu. The Layers palette will appear. Select the layer to move.
- Click the Up icon to move the selected layer on top of the item immediately above it in the (sub)stack.
- Click the Down icon to move the selected layer under the item immediately below it in the (sub)stack.
By default, the page and pasteboard are the active drawing layer. The active drawing layer is where an object is drawn on the top of the active drawing layer's stack. When selecting objects with the Object tool or text with the Text tool, only objects and text on the active drawing layer may be selected. When importing or pasting objects, the objects are placed on the top of the active drawing layer's stack.
To set the active drawing layer with the Layers palette: Choose Show Layer Palette from the Window menu. The Layers palette will appear. Click in the far left column of the layer to make the active drawing layer.
To select an object on a layer: Make the layer that the object belongs to the active drawing layer. Select the Object tool. Select the object. That object may then be moved, rotated, the line & fill changed, deleted, or any other modification possible for the object.
To move an object from one layer to another: Make the layer that the object belongs to the active drawing layer. Select the Object tool. Select the object to move. Choose Cut from the Edit menu. Make the layer that the object is be moved into, the active drawing layer. Choose Paste from the Edit menu.
To lock/unlock layers with the Layers palette: Choose Show Layer Palette from the Window menu. The Layers palette will appear. Click on the pen icon of the layer to toggle between locked and unlocked.
To hide/reveal layers with the Layers palette: Choose Show Layer Palette from the Window menu. The Layers palette will appear. Click on the eye icon of the layer to toggle between visible and hiden.
|
|